The Pencil Tool is a rarely used tool in Photoshop.
You can create straight lines in Photoshop very easily
You can create straight lines in Photoshop very easily
but what about diagonal lines? Nothing difficult though.
You can make this effect easily with this tutorial on creating diagonal lines with Photoshop.
I have been asked to post a tutorial on creating diagonal lines in Photoshop. You can use the diagonal lines created as a Pattern, which you can save for later use as well. We will be using the Pencil Tool that is rarely used in Photoshop.
Lets Begin:
Step1:
Lets Begin:
Step1:
Step 1 : Go to File>New.
Step 2 : When the New dialogue box opens set the Width and Height at 24 pixels. Click ok.
Step 3 : The New document will appear as a tiny square of White. Press CTRL+= to increase the size that can be workable with.
Step 4 : Click on the Brush and then the Pencil Tool.
Step 5 : Click where the arrow points to. This will display this Menu. Set the Master Diameter at 10 pixel and Hardness to 100%.
Step 6 : Click once with the Pencil Tool which is already selected.
Step 7 : Press Shift and click again diagonally till the diagonal is completed.
The diagonal line has been completed.
Step 8 : Now centre the midpoint of the Pencil at the left bottom corner and click once. Do the same at the left top corner.
Step 9 : Click on Magic wand Tool.
Step 10 : Click once with the Magic wand Tool on the White area. All the White will be selected. Now press CTRL+SHIFT+I. This will inverse the selection and only the Black portion will be selected.
Step 11 : Press CTRL+J. The selected black portion will be cut and pasted on a new Layer 1.
Step 12 : Go to Edit>Define Pattern.
Step 13 : This dialogue box opens.
Step 14 : I have named the pattern Diagonal by typing it in. Click OK. Close the White document. We will not need it any longer.
Step 15 : I have now opened this free stock image.
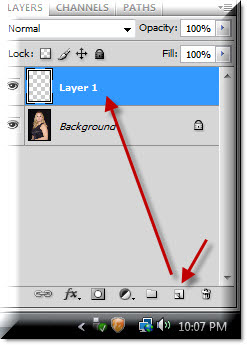
Step 16 : In the Layer pallette click on the New Layer icon and new Layer 1 forms.
Step 17 : Go to Edit>Fill.
Step 18 : In the Fill dialogue box change the Use to Pattern from the dropdown menu.
Step 19 : When you click the Custom Pattern, the Pattern created is the last one. Click to select it. Click OK.
Step 20 : As soon as you click, the Diagonal Pattern fills the layer.
Step 21 : This is how the Layers pallete looks like. The photo of the girl is in the Background Layer and the Diagonal fill layer on Layer 1.
Step 22 : Click where the arrow points to in the layer pallete to bring up the Blend Modes. From the menu I have clicked on Soft Light. I have chosen it because it works for this image. The Blend Mode can very well be Overlay, Screen, Lighten or even Multiply. It will depend on your image.
And this is how the photo looks.
Step 23 : Click on the Add Layer Style button and click on Bevel and Emboss.
Step 24 : In the left of the panel that opens click on Contour.
Step 25 : Change the Technique to Chisel Hard.
Step 26 : I have increased the Size to 30 pixel. Click OK.
And this is how my photo looks.
Step 27 : In layers pallete, I have decreased the Opacity of the Layer to 50%.
And, this is my finished image.


