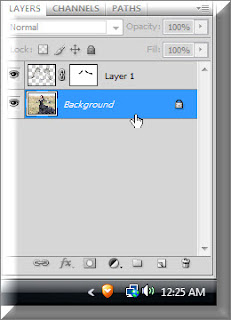
Let us create a winged figure in photoshop. You need the wings first.
Step 1 : Open a photo to which you want to add the wings.
Step 2 : Click the Magic Wand Tool.
Step 3 : Click on the black portion with the Magic wand Tool A selection appears around the edges and also around the wings. Press CTRL+SHIFT+I to inverse the selection. Then press CTRL+J. This will cut out the wings and paste it on a new Layer 1.
Step 4 : Look in the Layers palette. The wings have been cut from the Background layer and pasted on Layer1.
Step 5 : Press CTRL+A (Select ALL), then CTRL+C (Copy).
Step 6 : Click on the photo of the woman and press CTRL+V (copy) The wings will be pasted on top of the woman.
Step 7 : Press CTRL+T. A selection forms around the wings. Move the selection with the Move Tool to the woman's shoulders.
Step 8 : Press SHIFT+ALT. Drag a corner handle. The wings will increase in size proportionately.
Step 9 : Click the Move Tool.
Step 10 : Use the Move Tool to position the wings around the shoulders.
Step 11 : Hover the Move Tool near the right bottom corner. A small bent arrow will appear. Use it to rotate the selection till it aligns with the woman's shoulders.
Step 12 : Use the Down, left and centre arrow keys on the keyboard to position the wings as accurately as possible on the shoulders.
Step 13 : Click where the arrow point to in the Layers palette to bring up the Blend Modes. Click on Multiply.
Step 15 : Click on the Layer Mask button in the Layers palette and a Layer Mask forms next to the layer thumbnail on Layer 1.
Step 16 : Use the Zoom Tool to zoom into the image.
Step 17 : I have zoomed into the image. Portions of the wings are covering the arms and dress.
Step 18 : Click on the Brush Tool.
Step 19 : Click where the arrow points in the top pane to reveal the Brushes. Set the Hardness to 0. You can set the Master diameter or how large the brush tip will be with a helpful shortcut. Use the ] (right bracket key) to increase the brush tip and [ (left bracket) to decrease the tip.
Step 21 : Use the Brush Tool to wipe away the wings covering the woman's jacket and arms.
Step 22 : Brush the other arm as well.
This is how the image looks.
Step 24 : Click on the Background layer.
Step 24 : Go to Filter>Render>Lighting effects.
Step 25 : The Lighting Effects dialogue box opens.
Step 26 : Use the cursor to change the angle of the light. You can rotate it.
Step 27 : Rotate to the left. Click OK in the Lighting dialogue box.
This is how the image looks.Step 28 : In the Layers palette click on Layer 1 then change the Blend Mode to Normal.
The finished image.


