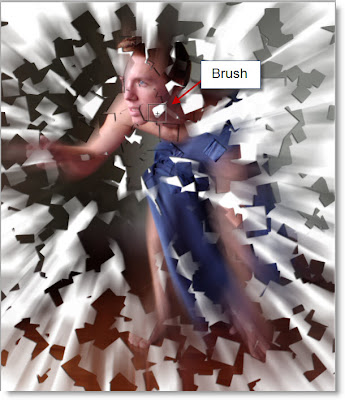
One of the Brushes built into Photoshop, whatever be the version is the Square Brush. You may not have used it. You can use it to make a special effect -- Shattered effect. It is quite simple and can be done in any version of Photoshop.
The 'Shattered Effect'. It is simple and can done in any version of Photoshop.
Photoshop has a lot of brush sets built into it, whatever be the version you are using. One of them is the Square Brush. You may not have found a use for it, if you have accessed it, but I will show you how to create a shatter effect with it.
Step 1 : I have opened this free stock image in Photoshop. You can download it here . It belongs to http://goblin-stock.deviantart.com/
You can download it for free, but you have to register. Registration is free.
Step 2 : Press ALT and double click the Background layer. It will turn to Layer 0.
Step 3 : Press CTRL and click the New layer icon. A new Layer 1 forms below Layer 0.
Step 4 : The Foreground Color should be set to the default Black and Background to White. If it not press 'x' and then 'd' on the keyboard.
Step 5 : Press CTRL+BACKSPACE. Layer 1 will be filled with White. You will not notice any change in the image as it is below Layer 0.
Step 6 : Click on Layer 0. Press ALT and click the Add layer Mask button. A Black layer mask forms next to the layer thumbnail.
This is how Photoshop looks like.
Step 7 : Click the Brush Tool.
Step 8 : Click this icon in the top panel on the right.
Step 9 : My Brush sets are quite large because I have installed a huge number of free brushes. You will find a short list. Square Brushes should be at the bottom.
Step 10 : Click the Square Brushes to select them.
Step 11 : This dialogue box opens as soon as you click the brush. Click on OK.
Step 12 : These are the Square Brushes. I have selected the largest one. Brush No 24.
Step 13 : Click on Brush Tip Shape.
Step 14 : Click on Shape Dynamics. Increase the Minimum diameter to 100%.
Step 15 : Click on Scattering. Check 'Both Axes' at the top and drag the Scatter slider all the way to the right, though it is not shown here.
Step 16 : Again click on the Brush Tip shape. Drag the Spacing slider to 50%.
Step 17 : Click the small double headed arrow to make the Brush go away.
Step 18 : Click on the Add Layer Style button and click on Drop Shadow.
Step 19 : The Drop Shadow dialogue box opens. If you are using a low resolution image, just click OK. But if you are using this high resolution image increase the 'Distance' to 10 and Size to 8. Click OK.
Step 20 : You can see the Square Brush Tip. To decrease the size press [ (left bracket next to the letter P on your keyboard). To increase it press ] (right bracket).
Step 21 : Switch the Foreground Color to White by pressing 'x' on your keyboard.
Step 22 : I have begun painting with the Brush.
Step 23 : I have painted quite a bit with the Brush.
Step 24 : Bring up the Brush dialogue by clicking on the icon on the right of the top panel. Increase the Spacing to 75%. Make the size of the Brush smaller by pressing the [ (left bracket key).
Step 25 : This is how the image looks after increasing the Spacing of the Brush and making it smaller.
Step 26 : Press 'x' on the keyboard t change the Foreground Color to Black. Make the Brush bigger by pressing the ] (right bracket).
Step 27 : Now paint towards the sides of the image. As you paint you will get the 'fragmented' look.
Step 28 : When you are satisfied with the effect press CTRL+J. Layer 0 duplicates into Layer 0 copy.
Step 29 : Go to Filter>Blur>Radial Blur.
Step 30 : The Radial Blur dialogue box appears. Set the amount to 75, Blur method to Zoom and quality at Best. Move the centre of the Blur with your cursor so that it is on the image.
This dialogue will appear if you are using a high resolution image.
This is how the image looks after the Radial Blur is applied.
Step 31 : Make sure your Foreground Color is set to Black.
Step 32 : To make sure that the layer Mask on Layer 0 copy is selected, click on it. You will find a tiny white border appears around it. This indicates it is selected.
Step 33 : Begin painting with the Brush. use it on the face and other parts of the body.
And this is the finished image. I don't think that was difficult. Try it out.


